Oh dear. I seem to have found a new favorite craft. Back when I hung out in an online sewing community, we good-naturedly teased one of the moms about making "noun shirts" all the time. Suddenly, I get it.
Here are my supplies (these are affiliate links). Soft, thick, blank t-shirts. These come in a lot of colors, and I can see myself ordering more of them for future projects. Fabric Mod Podge, note this is not the regular Mod Podge, but a special formula designed for fabric and washing. Red extra fine glitter, which I might need in more colors to feed this new passion. And last but not least, leftover contact paper. This particular roll was purchased several years ago to recover the tabletop surface of Annaliese's old high chair base (circa 1995) which is still being used to hold Hannah's dollhouse in the panda room today.
First things first, I pre-washed the shirts. Then I cut a couple of nice big pieces of contact paper and cut a heart out of one of them. I used the inner heart piece to get an idea where I wanted to place the glitter heart on the shirt.
The tape dispenser is holding down my inner heart (with the backing still on) and I removed the backing from the "stencil" and aligned it with the inner heart to stick it down in just the right spot.
Stencil ready for glittering.
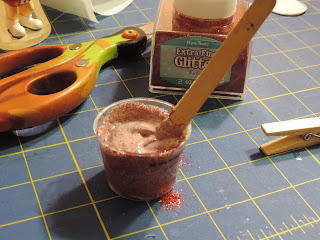
I used a craft stick and an old medicine cup for mixing up my glitter concoction. First some fabric Podge...
Then some glitter. I didn't use exact measurements, I just aimed for half and half.
Upon mixing, I decided I was a little light on the glitter, so I added a bit more.
Although I did this project by myself, I think Hannah, who is 8, would be able to do it with me next time.
Once I had my "glitter podge" I painted it inside my stencil.
For Katie's shirt, I wanted a slightly smaller heart than Hannah's, since it would be on a smaller shirt. I traced the inner heart on my second piece of contact paper and cut inside the line by about a quarter inch.
Placing the stencil on Katie's shirt.
The "glitter podge" was almost a gray color when it was wet, which worried me a little, but as it started to dry, the podge dried clear, leaving behind just the beautiful ruby red glitter.
The next morning, I checked on the shirts and noticed a few spots where there was pink shirt peeking through the glitter, so I touched those up a bit with the still wet glitter podge left over from the night before.
Once the second spots were dry, I carefully removed the contact paper stencils, pushing down a little on the glittery edges. I love how crisp the edges came out!
Katie is 5 years old, and wears a size 5 in most things. I purchased the 6 years t-shirt for her and prewashed it before crafting. Hannah will be 9 in 3 months, and wears about a size 8, although some things she wears are smaller. Hannah is wearing the size 10 years t-shirt, also prewashed. It's a little loose, but comfortable. I'm pleased with the sizes I chose for both girls.
The instructions on the Fabric Podge say to wait 72 hours before washing. I'll be sure to let you know how the shirts fare in the wash.
This post may be linked up at these linky parties.


This is adorable! My daughter would love a shirt like this.
ReplyDeleteThanks! It was really fun to make, and I'm pleased with how it turned out. :)
DeleteThese are totally ADORABLE!!!! I am sharing this great craft!
ReplyDeleteThanks for the tutorial!
Thank you, Lisa! I appreciate the shares. :)
DeleteVery cute! Your daughters are adorable :)
ReplyDeleteThey really are cute! I can say that because it's not my genetics, lol. ;) But I often smile at how adorable they are.
DeleteSo fun! This is so cute. I just discovered there were different types of Modge Podge the other day. I have never honestly used it. I just bought some though and have a project in mind. Thank you for sharing with us at Sitting Among Friends on Wednesdays. I look forward to seeing you again next week.
ReplyDeleteOh, I can't wait to see what you do with it! With this massive prize pack, I need all the ideas I can get, LOL! :)
DeleteThank you for linking up to Good Tips Tuesday! You will be featured today. http://abirdandabean.com/2016/02/valentines-day-treats-ideas.html
ReplyDeleteOooh, thanks a million! :)
DeleteLove the shirts! We may have to do something like this. Cute!
ReplyDeleteI'm going to do shamrock ones next. :)
DeleteThe girls are adorable in their new shirts. What a great idea! Thanks for sharing this on the Virtual Fridge
ReplyDeleteThank you! :) It feels really good to be crafting again. I've missed the creative outlet.
DeleteThese are great! It looks like quite an easy project too.
ReplyDeleteVery easy! In fact, I just did shamrock ones for St. Patrick's Day! :)
Delete